New Roomba Prototyping Cable for Arduino
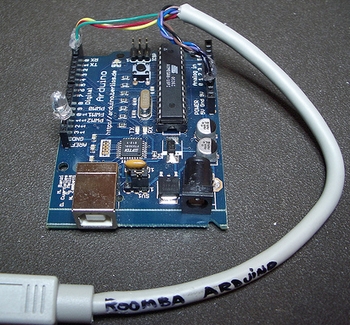
In the book I discuss how creating a “Roomba Prototyping Plug” is useful when prototyping Roomba circuits with microcontrollers. The plug described is general purpose for use with any microcontroller and is easily built.
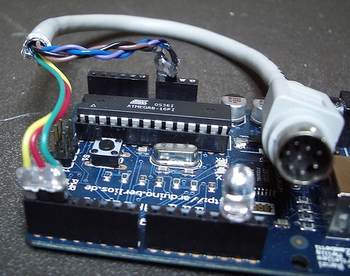
A slight variation of that plug allows a Roomba to work with an Arduino board with no additional circuitry or wiring. Not only does it allow you to control the Roomba from Arduino, but the Roomba also powers the Arduino board.
Higher-res images and full photoset.
13 comments13 Comments so far
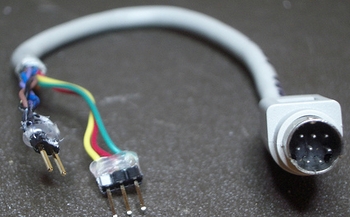
Instead of soldering wire onto the back of headers (tricky because they are short), I like to use male crimp pins – jameco #145357. Slip them into connector housings (#100811 for 2 contact, 157382 for 3 contact) to prevent them from touching each other and you’re good to go.
Bjoern, that’s a great idea. I’ll try that out for the next cable I build. I admit I only did the header soldering because I happened to have them laying around in my junk box. :)
I’m curious about the powering aspect. It looks from the pictures like you’ve got the Roomba’s PWR and GND wires going right into the 9V sockets on the Arduino. I thought there was 16V coming off those wires? How does this not fry the Arduino? Or maybe there’s a 78L05 tucked away in a corner I’m not seeing :) ?
The Arduino has on it a standard 7805 voltage regulator that can take input voltages anywhere from 7.5V to 35V. The “9V” input really means “7.5-35V”. But it’s easier to think of it as a single value.
Okay, that would explain it. I guess I’ll just have to look closer @ my Arduino board(s).
Thanks!
I made one tonight. It works :)
I made it with a “floating” DD pin ’cause I’ve got a BlueSMiRF on the prototype shield of my Arduino and need pin 2 for that.
Thanks for the neat idea!
Can I get more info on connecting both the Roomba serial and Bluesmirf? I expect the Roomba wants the pins 0_RX and 1_TX for its SCI, does that mean the bluesmirf could go on any other digital pins on the arduino and we use ‘software serial’ somehow to talk to a PC, say?
cheers
Colin
Yes, if you want to have do a Bluesmirf + Arduino + Roomba, the easiest might be to hook the Roomba up to the hardware serial TX/RX pins on the Arduino and then hook the Bluesmirf up to any two other digital pins and use SoftwareSerial at 9600 bps.
[…] pin bank.) Tod Kurt, author of Hacking Roomba and part of the impressive ThingM studio, has a basic photoset showing as similar cable. At this point, if you’re looking to do this yourself, you may be wondering which wires in […]
I made this connector and it simply won’t work to save my soul. I have checked and rechecked. I have a roomba 530 with a nove arduino.
Thanks,
:-)
Others have had this problem too. Someone with a newer Roomba has figured out a solution using SoftSerial instead of normal Serial, check it out here:
http://www.netfluvia.org/layer8/?p=127
[…] a Roomba Serial Interface, Controlling A Roomba with an Arduino, DIY Roomba USB interface cable, New Roomba Prototyping Cable for Arduino, Arduino Robotics Project, …), learned a lot, and figured out how should I proceed with my […]
Hey Guys:
Don’t know if you anyone is still stuck with getting all the pins correctly setup, but I just use a rootooth (bluetooth to SCI adapter) that will allow me to hook up to the device wirelessly and thus I won’t be “tethered down”. The rootooth is powered from the roomba as well, so its really nice.
It really helped me to play around with the roomba initially with my computer so I could get a sense of what all the commands did before I progressed to the Arduino. To cover the basics, I found a good introductory source on how to communicate to the roomba via its SCI interface is here:
http://www.robotappstore.com/Knowledge-Base/1-Introduction-to-Roomba-Programming/15.html
I’d recomend looking at it, as there are some ticks to communicating to the roomba that drove me crazy until I read it. It also looks like you can download a bunch of other applications from the site if you look around a bit, so its worth a peek. :)
Hope this helps!