Build a Cylon Roomba

In the Diggnation #71 podcast, Alex and Kevin were discussing some prequel to the current very awesome Battlestar Galactica series and one of them said something like “you know how it all starts don’t you? Roombas. When they’re bumping into your shins they’re really trying to take over the world.” And then they showed a little CGI mockup of a Cylon Roomba. Well, I thought, that can be made in real life. No computer graphics needed.
Here’s how to make your very own Cylon Roomba. Like the projects in the book, this one doesn’t harm or permanently modify your Roomba. After you’re done playing Cylon with it, you can turn it back into a music box, painter, or even a vacuum cleaner (I hear they do that too). You don’t need the book to do this project, but it might help if you’re not that experienced with electronics and programming.
(All photos below are available in higher res in this flickr photo set)
The Five-minute Version
The project below is fairly complex compared to many other Roomba hacks, since it requires you to build a circuit, a physical structure, and write code. If you don’t want to go through all that, you can get one of those $20 “LED grill scanners” from your local auto parts store and plug it into the Roomba’s power jacks.
It doesn’t look nearly as cool, I think, but it is quick-n-easy. Time for the real deal.
The Circuit
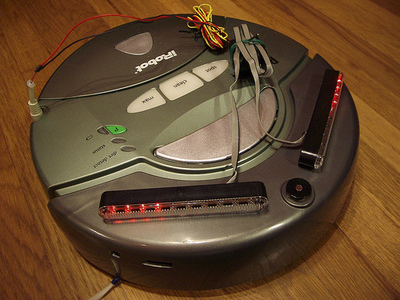
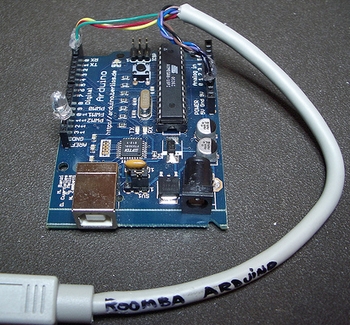
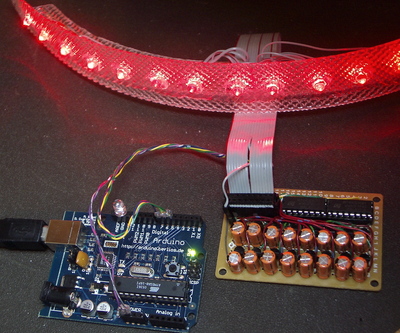
An Arduino microcontroller board is used as a replacement brain for the Roomba and also controls which LEDs light up when to recreate the Cylon “scanning”. To connect an Arduino to a Roomba, use something like the Roomba prototyping cable and it will plug directly in.
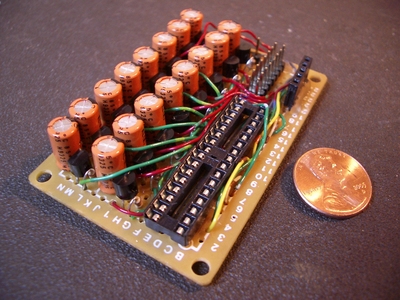
The LED driver is a bit more complex. To address 16 independent LEDs, two 74HC595 parallel out shift registers are used. The circuit below is a copy of the one on the Arduino site about using the 595.
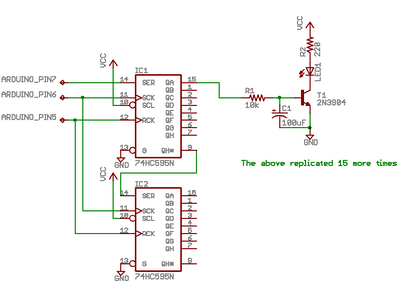
You could hook LEDs directly up to the outputs of the 595s, but to complicate things, you can stick another circuit between the 595s and the LEDs. This extra circuit creates a subtle fading of the LED’s light as it’s turned off. This replicates somewhat how the incandescent lights worked in original Cylon costume. The idea for this was stolen from a great page on how to make a Cylon jack-o-lantern.
You can wire it up in whatever way you’re comfortable. The circuit does just barely fit on a little Radio Shack breadboard, but it’s very cramped.
Once you’ve tested the board by itself, you can hook it up to an Arduino and see if it works with the code. You can use any LEDs, they don’t have to be mounted in the eye piece yet.
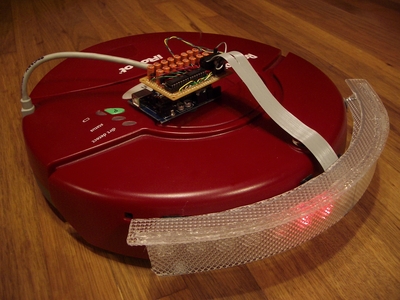
Eye Construction
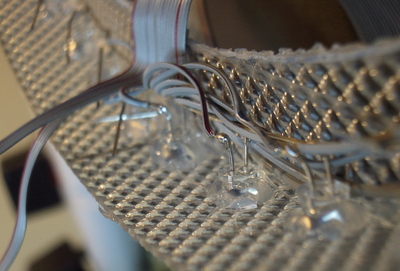
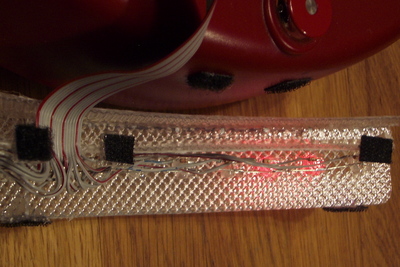
The LEDs needed to be housed in some sort of eye piece that could fit on the front of the Roomba. Because of the narrow emission pattern of most LEDs, adding a light diffuser would also be good. There are many robust ways to go about this, but I wanted something that I could build fast and cheap.
I decided to used a lucite light panel from the hardware store ($6 for a 3’x4′ sheet) and cut it into appropriate shapes with a Dremel. The pieces would be assembled with hot glue. The lucite panel was nice because it was designed as a light diffuser, solving that problem. It’s also lightweight and flexes. This flex lets you make the curved from by bending a straight piece around a curved spar. It also makes mounting the LEDs much easier as you can work on a straight piece for all the drilling and gluing.
The Software
The software to test the eye by itself is a pretty straight-forward adaptation of the software on the Arduino ShiftOut tutorial page.
– CylonEyes.pde
The first version that integrates the cylon eye and a rudimentary custom Roomba behavior is called RoombaCylonAlpha. It just drives around bumping into things and turning, “scanning” with its eye and turning all red when it does run into things.
– CylonRoombaAlpha.pde
Assembling It All
Once everything is built you can mount it on the Roomba. While the LED driver board is about as big as an Arduino shield, it’s not one so it can’t just plug on. But you can use a stand-off to connect the two boards together.

And then you can start doing silly parodies of your favorite BSG episodes.
10 comments
Submitted to digg.com: http://digg.com/mods/Build_a_Cylon_Roomba
Im making one for eveyone i know this is great man … I battlestar — have a great holiday
Nice! You can also call this “Night Rider Roomba.”
That’s so stinkin’ cute!
Yeah, it’s neat and all…
But can it destroy humanity as we know it?
Well, iRobot does also make the PackBot…
[…] Category Cloud Arduino ATTiny45 AVR build Electronics Firmware Prototyping Software Uncategorized ProjectSteve: Cylon attachment May 3, 2009, 5:29 pm Filed under: ATTiny2312, AVR, Electronics My friend Johnny has brought into work a Roomba clone. Apparently it is not particularly effective at cleaning, so we have decided to hack it. It is named ProjectSteve. He’s already has his vacuum cleaning parts removed and he is pretty good at carrying stuff. When discussing what to build we came up with the idea of building a light strip like KIT or a Cylon. It seems someone else already had the idea of Cylons and has added one to a Roomba. […]
[…] shape of the rooms from run to run. Unfortunately, the hacking sites are filled with lameness like adding Knight Rider lights, […]
[…] Build your own Cylon Roomba. Learn about how they work in order to reprogram them and avert the Cylon war! […]
[…] Roomba al estilo “Battlestar Galactica†podéis seguir paso a paso las instrucciones en la web Hackingroomba, en la que os explican con todo lujo de detalles como dotar a vuestras aspiradoras del ojo rojo de […]