iRobot Create Robot Review
At the 2007 CES iRobot announced a robot explicitly designed for hobbyist and educational robotics experimenters called the iRobot Create.
The iRobot Create is now shipping and iRobot kindly sent me one to review and verify it’s applicability to the Hacking Roomba book.
In short, all the projects Hacking Roomba work great with the Create, as it’s fully compatible with all ROI-based Roomba hacks. The Create is a better device for robotics experimentation if you’re an educator, academic, or serious about robotics. However, if you’re a casual hacker, a Roomba Red still provides a better value (and is a vacuum cleaner to boot).
What is the iRobot Create Programmable Robot?
The Create is essentially a non-vacuum Roomba. iRobot doesn’t consider it a Roomba because it has no vacuum, the hallmark of their line of domestic vacuuming robots. For the robotics experimenter, think of the Create as an improved Roomba.
All hacks presented in the Hacking Roomba book will work with the iRobot Create. Several are easier thanks to the mount points. The Create opens up additional capabilities that would normally require you to install additional hardware.
Create Robot Details
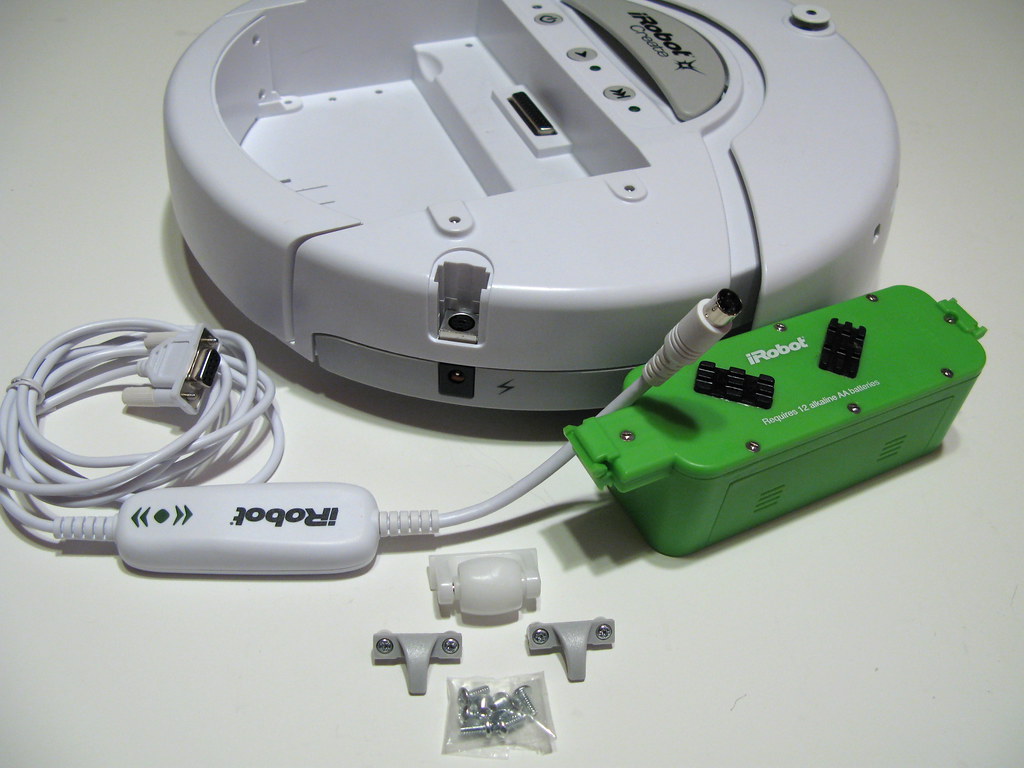
The picture above is what you get when you buy just the iRobot Create for $129. You get:
- Create robot
- Create Open Interface (OI) serial tether
- battery holder pack (takes 12 AA cells)
- back wheel
- wheel drop inhibitors
- screw set for the cargo bay mount points
The Create Command Module (discussed below) is an optional microcontroller box you can program and costs an extra $60. It is not required to use the Create as a robot.
The Create is very similar to a Roomba in both looks and action. It uses the same framework as a Roomba but omits the vacuum parts (to give you more battery power for your own projects). At first glance it looks like a bleached, hollowed-out Roomba Red.

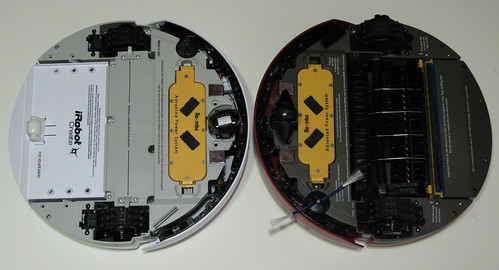
Like a Roomba it has two drive wheels and a piezo beeper. It also keeps the bump, cliff, wheeldrop and IR sensors of the Roomba. The Create omits the vacuum and brush motors and the dustbin becomes a cargo bay.
Improvements over the Roomba
As a robotics experimentation base, the improvements over a Roomba are:
- Includes a pre-built RS-232 serial tether
This is pretty great. It connects to the Roomba-standard mini-DIN 7-pin serial port on the edge of the Create. It also works with Roombas.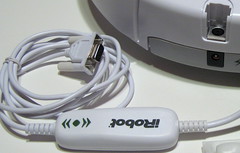
This is functionally the same as RS-232 serial tether presented in the book. - Mount points!
This is also pretty awesome.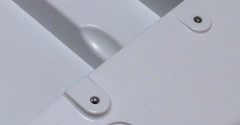
Mounting points accept standard 6/32 machine screws. All the mount holes have metal inserts, not plastic, so are sturdy enough to attach things that weigh something. The distance between the four “topside” mounting holes are 20mm on a side and 222mm across.
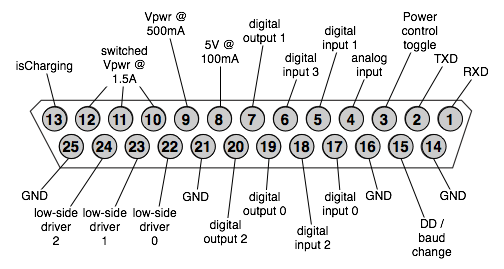
- 25-pin I/O connector in addition to standard ROI port
A standard DB-25 female “cargo bay connector” contains includes the same signals as the serial port on the side, as well as including several digital inputs and outputs and motor drive outputs. If your project mounts in the cargo bay, this connector is a nice short cut to the serial port signals.Below is a pinout of the connector, since the one in the Create OI manual I had had some errors.
- Swivel front caster
When a Roomba turns, its fixed front wheel would skid. This swiveling caster of the Create reduces that and hopefully makes turning a little more accurate.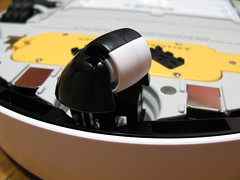
- Optional back wheel (not a caster)
Provides a stable “fourth leg” for the situations when you’ve loaded down the robot and don’t want it tilting back.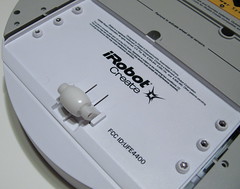
- Ballast for rear deck
Rear deck can be loaded with ballast pennies. The Roomba (and Create) are naturally a little front-heavy because of its large battery pack. This ballast can help balance the weight distribution. Pennies have a mass of approximately 3 grams. And you can hold a few dozen of them in the rear deck.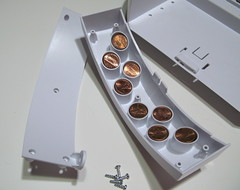
- Better (louder) speaker
Nuff said.
Deficiencies compared to a Roomba
There are two downsides to the standard Create package however. In truth it’s really that iRobot decided to make the Create system modular so you only pay for what you need. The result is that a truly usable Create system costs quite a bit more than a Roomba Red, since the two parts below are included in a Roomba Red package.
- No charger is included
However standard Roomba chargers are compatible. Get one of these.
- No battery included
Just a green empty battery pack. You must supply 12 AAs or use a Roomba battery.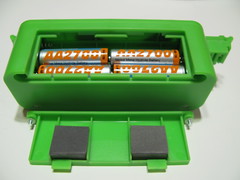
Create Open Interface (Create OI) vs Roomba Open Interface (ROI)
The Roomba Open Interface (ROI), originally called the Serial Communications Interface (SCI) is the serial protocol used to control a Roomba or Create robot from an external device like a PC. The ROI specification is here and the Create OI spec is here.
The COI is a superset of the ROI: all programs written for a Roomba with ROI will work with the Create robot via the Create OI. The Create OI adds some interesting new commands.
New Sensor Commands
The original Roomba SENSORS command (opcode 142) took one argument describing which sensor data subset (or “packet”) you wanted. Packet #0 gave you all 26-bytes of sensor data, packet #1,#2,or #3 gave you subsets.
The Create OI extends the packet subsets into 42 different subset packets representing up to 52 bytes. Packet #0-#3 are the same as on the Roomba. Packet #4,#5, and #6 are new subsets, and packet #7-#42 are single-value packets so you can easily get at a single sensor value. See below for a diagram of the available sensor data and packets.
With the addition of these new packet designators, you can use the SENSORS command to get fine-grained control over exactly what data you want to monitor. And to make it even easier and more efficient, there are three new commands to help you not call SENSORS over and over again.
- QUERY LIST (opcode 149)
This command takes a list of packet IDs and returns the data associated with those packets. The order in which you request the packets is the order in which it’s returned. Essentially this lets you create your own packet. - STREAM (opcode 148)
Instead of polling for sensor data with SENSORS or QUERY LIST you can send a list of packet IDs with the STREAM command. Every 15ms (the sensor update rate in the Create), the sensor packets you’ve designated are sent. Watch out though, because 15ms isn’t very long and at 57.6kbps, there’s only enough time for the Create to send about 86 bytes. There’s no way to modify the update rate. - PAUSE/RESUME STREAM (opcode 150)
This command lets you toggle on and off the deluge of data configured with the STREAM command.
Sensor Packet format for Roombas and the Create Additions
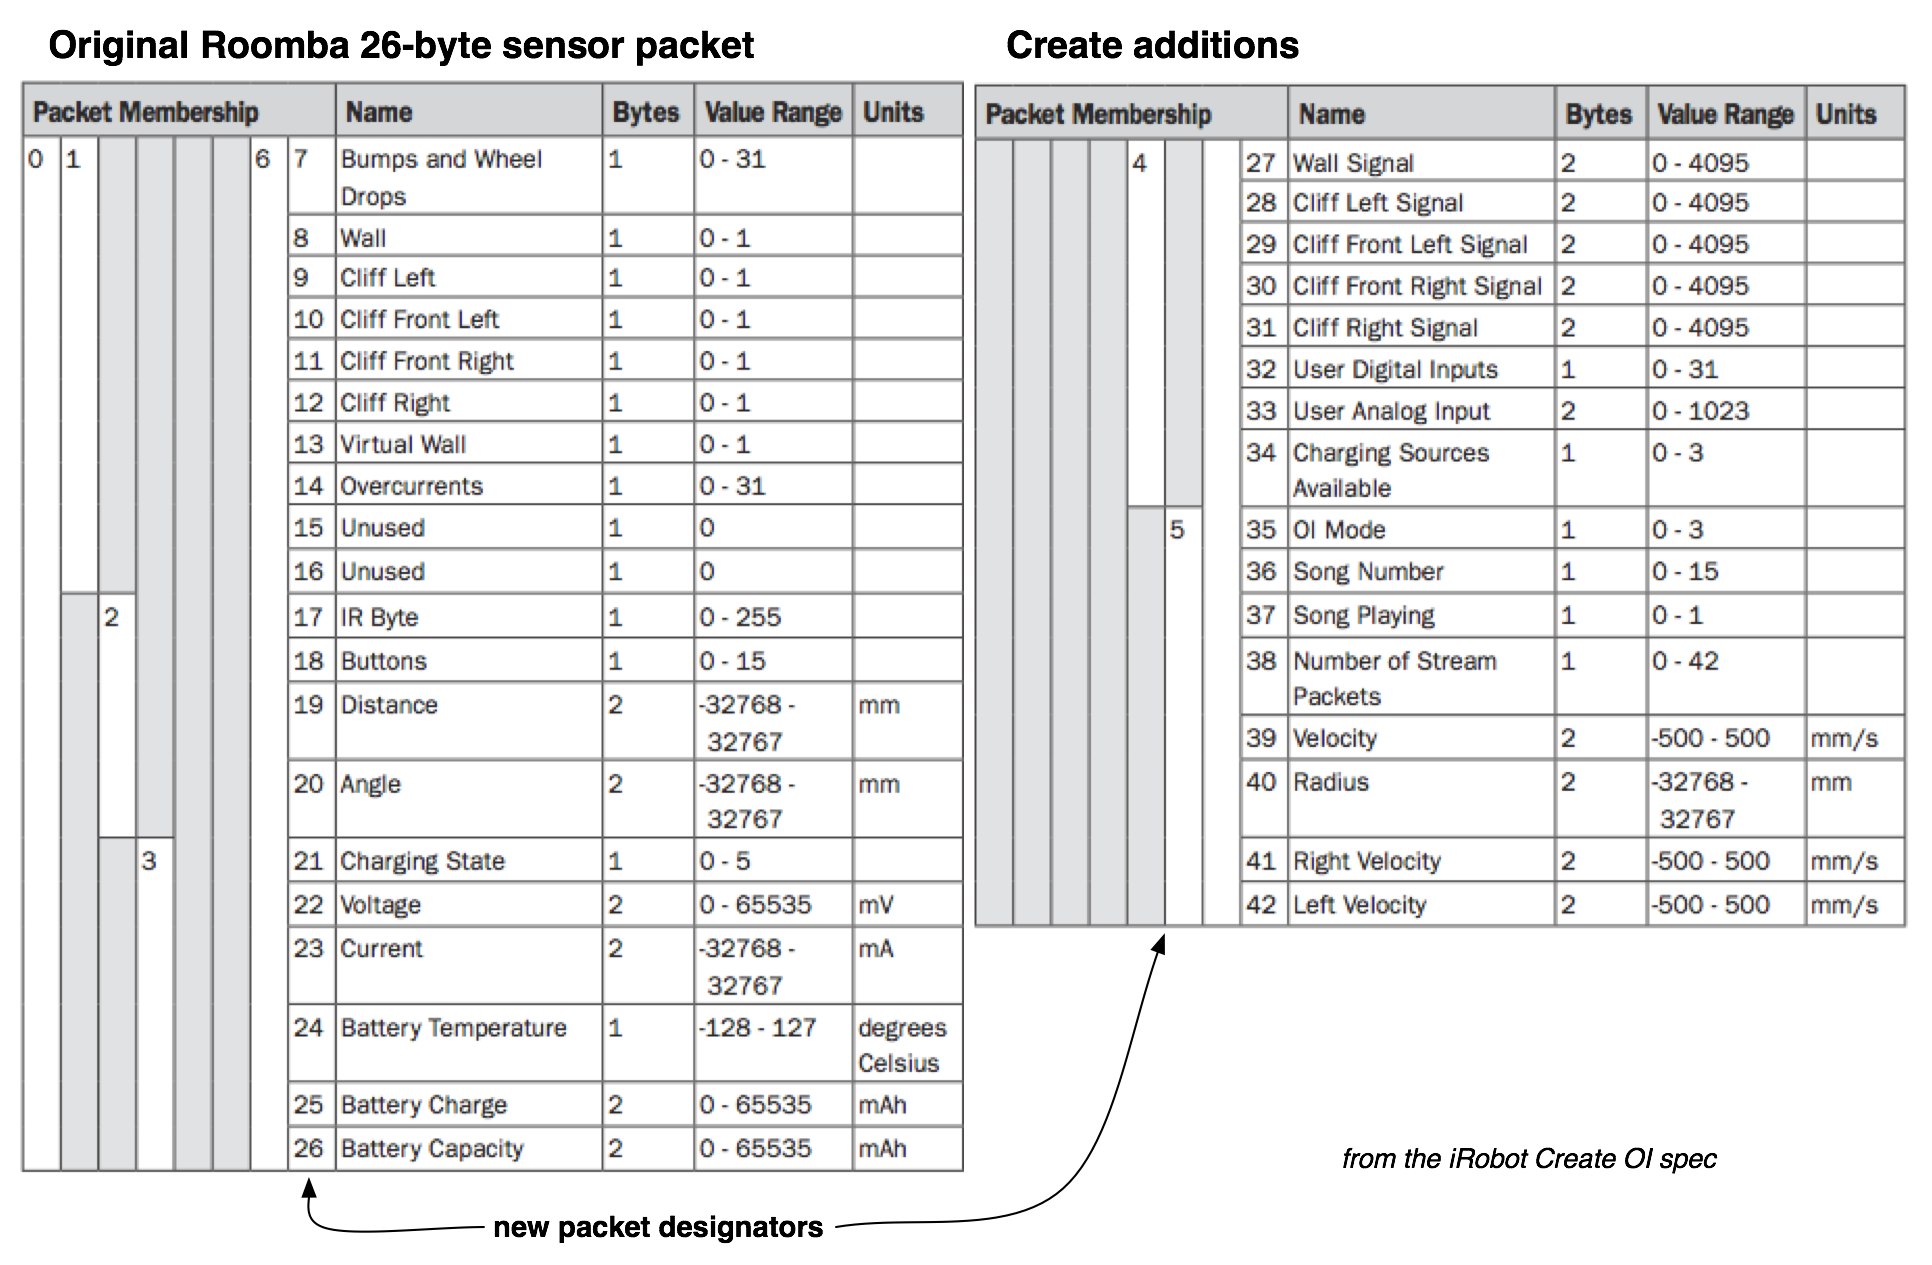
(click for larger version)
New Drive Commands
The Roomba DRIVE command (opcode 137) is supported, where you specify a two-byte signed velocity and two-byte signed angle. The “straight bug” doesn’t seem to have been fixed, so you’ll need to periodically toggle the angle value between 0x8000 and 0x7fff to get a true straight.
In addition to the DRIVE command, a new DRIVE DIRECT (opcode 145) is available that allows you to drive each wheel independently. This direct mode of driving the wheels is a welcome addition to those robotics enthusiasts who are used to this method of describing robot drive.
In my book, I derive formulas you can use to convert between a right/left wheel velocity to what DRIVE expects. Quickly, the formula is:
- r = b(Vleft+Vright)/(2(Vright-Vleft))
where “b” is the wheelbase distance (258mm) and “Vleft” and “Vright” are the left and right wheel velocities, respectively. So if you have a Roomba, you can replicate the functionality of DRIVE DIRECT.
New Actuator Commands
- DIGITAL OUTPUTS (opcode 147)
The cargo bay connector has three digital outputs capable of 20mA of current. This is enough to drive LEDs and switch transistors (and thus motors, relays, etc.) The lower three bits of the argument to DIGITAL OUTPUTS control the state of the three outputs. - LOW SIDE DRIVERS (opcode 138)
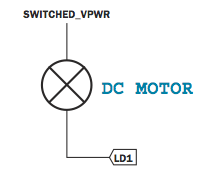
This is the same as the MOTORS command in the Roomba to control the three different brush and vacuum motors. Because the Create has no vacuum functionality, these drivers are now available for your use. These are called “low-side drivers” because they can only switch to ground and are meant to be used as a switch to power high-current devices like motors connected to “SWITCHED_VPWR”. Low-side driver 0 and 1 can sink 500mA, while 2 can sink 1.5A. The over-current sensors of the Roomba are still available if your add-on tries to draw too much current.Note that if you have a Roomba, the vacuum motor connectors are accessible when you remove the dustbin so you can have a single low-side driver capable of sinking 500mA if you need it.
Connecting to a low-side driver is simple, as the Create OI docs show: just connect the motor directly:
- PWM LOW SIDE DRIVERS (opcode 144)
If you want to have a sort of analog instead of digital control over the low-side driver outputs, use this command. It uses PWM to turn turn on-and-off the outputs at a xxx Hz rate, with the on time adjustable from 0-100%. The command takes 3 bytes, one byte for each output, ranging from 0 for 0% to 128 for 100%. - SEND IR (opcode 151)
The Create can send IR commands as well as receive them as the Roomba can. This means you can create a network of Creates, all exchanging information amongst themselves. As the Create OI docs show, to build an IR sending circuit, connect to low-side driver 1 (pin 23 of Cargo connector) like so: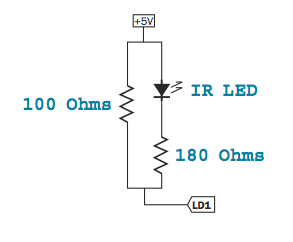
New Control Commands
Besides the standard Roomba OI commands of SAFE, CONTROL, and FULL there are a few new control commands. These aren’t that useful from a robotics point of view, and are perhaps only useful when testing connectivity to the Create.
- DEMO (opcode 136)
Let’s you select one of the 10 built-in demo programs. - SPOT COVER (opcode 134)
Starts the Spot Cover demo. - COVER (opcode 135)
Starts the cover demo. - COVER AND DOCK (opcode 143)
Starts the Cover and Dock demo.
Create Command Module
The Create Command Module is a totally optional part of the Create package. You don’t need it to use the Create as a robot.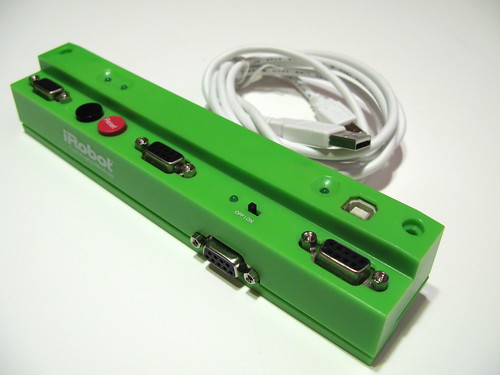
Inside, the Command Module is a small Atmel AVR ATmega168 microcontroller and FTDI USB-to-serial interface. It has a bootloader programmed into it that mimics the standard Atmel STK500 programmer used to program AVR chips.
Thus, it’s almost exactly the same as an Arduino open-source microcontroller board.
To program the Command module, you use standard AVR-GCC tools like Win-AVR, OSX-AVR, or the command-line verison of those tools. In other words, you program the Create Command Module, just how you can program any other Atmel AVR chip.
Using the Command Module
The “CMExamples.zip” set of example programs that ships with the Command Module is targeted towards Windows users, but it’s not limited to them. The examples can be used on any other platform with avr-gcc.
The changes are to edit the Makefile for a program with the following changes:
- comment out the DEBUG line
- change AVRDUDE_PORT to be the serial port of the Command Module on your OS. On my Mac, it showed up as “/dev/tty.usbserial-A3000Dim”.
Command Module Internals
It’s about what you’d expect from an ATmega16 + USB-to-serial chip.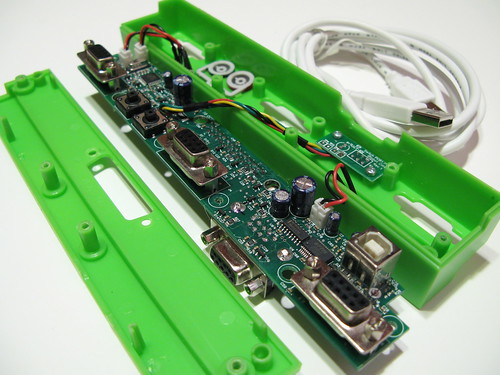
Conclusion
The iRobot Create is a great and inexpensive robotics platform, especially when compared to similar platforms aimed at academia. It uses standard Roomba parts for many of its subsystems, making it cheap to repair. However, if you’re only a dabbler in robotics, a discounted Roomba will likely be less expensive for you.
The new commands and capabilities can lead to some interesting experiments with minimal added hardware.
The Command Module is an good device for those desiring a quick and highly-integrated way to add intelligence to the Create. But again, cheaper solutions exist for those on a budget. Particularly the Arduino platform offers the ability to use all the Command Module code with no changes and is less expensive.
14 comments
iRobot Create Robot (review)…
Todbot (author of Roomba Hacking) has a review of the iRobot Crate Robot, he writes -At the 2007 CES iRobot announced a robot explicitly designed for hobbyist and educational robotics experimenters called the iRobot Create. The iRobot Create is……
HELP! My Roomba Intelligent FloorVac is the first model that came out (2001) and the two matching dual wheels have lost their rubber/plastic traction covers. Since the wheels still work perfectly, is there a way I can just buy covers for the wheels?
Thank you for any assistance.
Sandy Underwood
407 671-6xxx
Hi Sandy,
You might want to ask your question on the Roomba Review forums. There are lots of knowledgeable people there who have fixed broken Roombas and found replacement parts. I’ve not done such things so I can’t be to much help to you. Good luck finding parts. If all else fails, you may be able to buy a broken Roomba on ebay and cannibalize it for parts.
Do you know if it is possible to use the serial port at the same time as the cargo bay connector? I’d like to use the command module for the added functionality and use your serial to bluetooth connector to wirelessly communicate.
BTW – great book!
Scott
Hi Scot,
Thanks! I’m glad you’re enjoying the book. You can definitely use the cargo bay connector at the same time as the Create’s OI port. In fact, the serial lines in the OI connector are duplicated in the cargo bay connector (TX & RX, pins 1 & 2).
However, using the command module at the same time as something plugged into the OI connector isn’t possible because the command module uses the TX & RX lines to control the Create. For it to both control the Create and talk over Bluetooth would require for the command module to have two serial ports, which it does not.
Thanks, Tod.
Do you think it would be possible to take your bluetooth adapter from the book and interface it with one of the inputs on the command module?
Sounds like a fun challenge for me to tackle!
Hi Scott,
Funny, I was just thinking about that! The command module is just an AVR ATmega168, exactly the same chip that’s part of Arduino. Arduino has a library called Software Serial that lets one use any other set of I/O pins as a second (slower) serial port.
You should be able to pick two unused I/O lines on the command module, hook them up to the Bluetooth module, then use something like SoftwareSerial to turn those lines into a serial connection back to your PC. The original serial port of the command module then controls the Create.
Hi.
I am an avid user of roombacomm; i’ve even hijacked your code to control my other serial revices. I was wondering if you had any ideas for improving the stability of the create. I’ve put a huge 12 volt battery in its cargo bay, but if you put something tall enough on it, it starts to sway. the cargo bay is not connected to the rest of the roomba well, and the palstic bends. If you just press down on the cargo bay you can feel it. any ideas? I’ve also just switched to a MAC and rxtx is having some issues, but i’ll work those out.
Hi Isaac, I hear you about Roomba/Create physical wobbliness. I’ve tried many things to make it more stable and haven’t really found a solution. But then I’ve not been looking too hard lately. My last idea that I never implemented was to make an aluminum brace screwed into the various mount points. I recommend poking around the iRobot Create Forums. They may have some ideas.
In regards to using RXTX on a Mac, I recommend downloading the Arduino software, pulling out the “RXTXComm.jar” and “librxtxSerial.jnilib” files from it, and replacing the same-named old RXTX files. The Arduino community has worked on making RXTX work really well on both Mac OS X & Windows. These changes are in the RXTX source repository, but not yet in the downloadable version of RXTX.
Hey check out this sweet Roomba Video!!
It’s so funny and the song is great!
http://www.youtube.com/watch?v=4C2zGwwraEA
-John
How can I within my software detect if the USB cable is inserted or not?
-Ole
Haha nice vid John
Can I use the iRobot Create with my iMac? Is there a USB port to download scripts? Also, can I run it unteathered to the Mac?
Are you sure on the mounting holes? I ordered my create, but would like to work on some design before it arrives. 20 mm is < 1 inch and the holes look like they are further apart than that.
David