Build A Roomba Bluetooth Adapter
[originally published 15 Feb 2006 in Makezine blog and edited by Phil Torrone
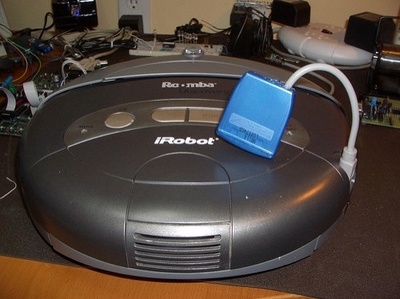
If you liked the serial port cable/board Roomba how to, you’ll really like this one – controlling a Roomba via Bluetooth! Roomba’s have a serial port that let you entirely control them. Adding a Bluetooth serial adapter to wirelessly control the Roomba isn’t that hard to do. It looks just like a serial port to the OS, so the software from the previous how to works with it too.
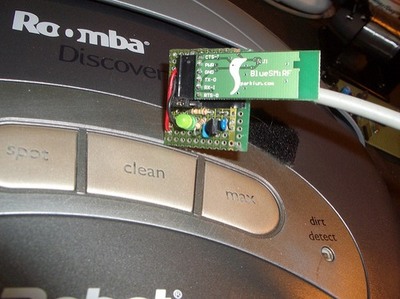
This was the first version I built, trying to make it as small as possible. While the x & y dimensions are a little smaller, the z dimension is about twice as tall. Since this is a nicer prototyping board with plated holes, it feels a lot sturdier than the second version using the cheap Radio Shack board.
Parts needed
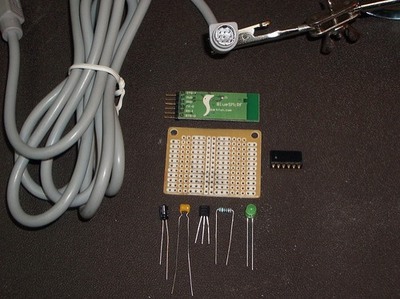
See Flickr photo with notes.
Circuit diagram

Larger version here.
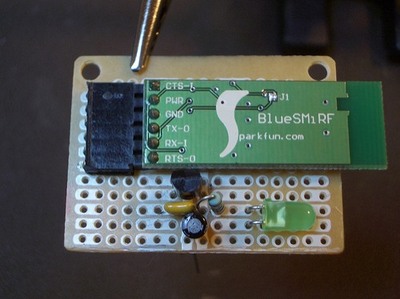
If the BlueSMiRF could take the +16VDC the Roomba puts out, the voltage regulator circuit below wouldn’t be needed and we’d save a lot of space.
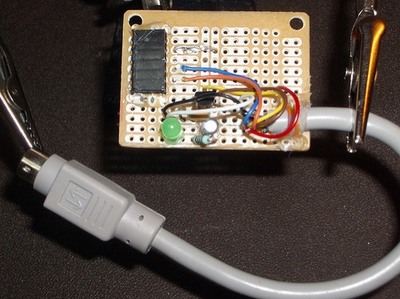
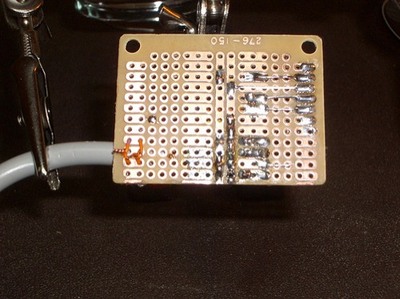
These Radio Shack prototyping boards are cheap ($1.79) which is nice, but since the holes aren’t plated thru with metal, getting solder to stick well is sometimes problematic. However, this does mean that if you mess up, it’s easy to remove parts.
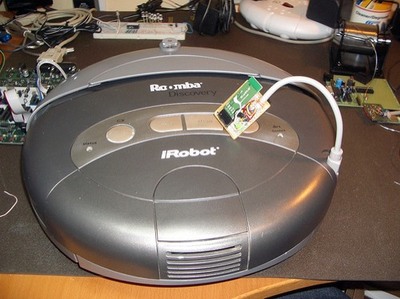
After testing continuity and voltage tests on all the pins going to the Roomba and the BlueSMiRF, I plugged in the BlueSMiRF and tried talking to it with the computer. When that succeeded, I plugged it into the Roomba and tried talking to the Roomba. Success!
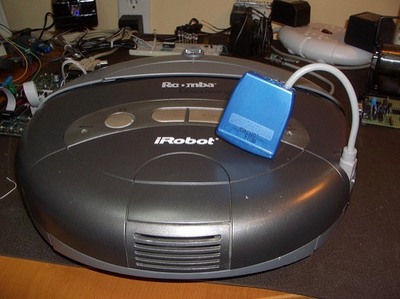
Every gadget deserves a little enclosure. Since this was Bluetooth, I figured a blue floss container was appropriate.
46 comments

So, when does the application for my bluetooth phone come out?
Nice hack.
Hi Zack,
If you’re phone is a recent J2ME phone, then there already is an application for you.
I’m curious. I understand you went with the BlueSmirf for its open-ended connection pins, but at $60 per card, why did you not try bodging a $10 usb bluetooth into the usb dongle circuit and make a very cheap bluetooth adapter with a professionally milled case?
Hi Cody,
If I could’ve used a $10 part instead of a $60 one I would’ve. Unfortunately, the economies of scale haven’t yet reached Bluetooth-to-serial adapters like they have Bluetooth-to-USB adapters, so they’re more expensive.
Also, I’m pretty sure that the $10 adapters rely on the computer to implement part of the Bluetooth protocol. The Roomba can’t do that so we need a part that fully implements Bluetooth. Even if it didn’t, USB is a very complex protocol compared to RS-232 (what the Roomba protocol essentially is). To act like a USB “host” to drive the $10 part requires a fairly powerful embedded computer system that runs a real OS like Linux.
Ah, that makes sense. The usb bluetooth adapaters aren’t much more than antennae and rely on the PC to do the translation (via drivers). I wasn’t familiar with how the Roomba’s serial port worked, but I should’ve realized a personal vacuum cleaner won’t have the processing power or the OS platform to handle the bluetooth protocol on its own. I just wish those BlueSmirfs weren’t $60 so I could convince my wife that our Roomba needed bluetooth. ;)
I bought one of these Bluetooth adapters (see link below) for use with my Roomba and it works great. Load the software, plug it in and and your connected. The best part is it only cost $9.95 with free shipping. I’m sure you can get that price by your wife. It’s a great little adapter. Good luck!
http://www.emtcompany.com/products/btusb.htm
What about using an IOGear bluetooth to serial like this one? Does RS-232 have power?
http://www.provantage.com/iogear-gbs301~7IOGB009.htm
I’m not affiliated with that site, I don’t know if it would work. I froogled it.
Hi Steve,
Yup, that would work. I have one of those. You have to take it apart to intercept the signals between the Bluetooth chip and the RS-232 transceiver. RS-232 voltage levels are approx +/- 10V while the Roomba expects 0-5V TTL signals.
Hey,
what is the software you are using to connect the pc to the roomba … the pc’s bluetooth to the roomba’s bluetooth.
Thanks, Ben!
Hi Ben,
The Roomba Bluetooth adapter appears as a normal serial port to the PC. So any software that can speak to a serial port can speak to the Roomba over Bluetooth. For the book, I wrote several different programs in Java, C, and Perl. You can see them in the code section.
Thanks!
I just got your book (enjoying it very much so far) and have setup a little roomba hacking center in my apartment.
I’ll be sure to post some images of my hacks once they are done.
Thanks again!
– Ben
From around 16v to 5v is quite a drop for the vreg, doesnt it get hot? How much power does the bluetooth adaptor use when transmitting at max power?
Hi Pyrofer,
Nope, it doesn’t get hot. The Bluetooth module draws very little current, under 100mA, which is why a tiny 78L05 can be used instead of bulky normal 7805.
Thanks, I hooked up my BT module (same one!) with a 7805 (old large plastic case not 78L05) and after about a minute its quite hot.
There is about 15v on the input. For now im going to stick a heatsink on it, but im worried about it going pop, and maybe pushing >5v out the output pin cooking the BT module.
Pyrofer, if you’re drawing enough current to make a 7805 hot, something is seriously wrong! Disconnect the BT module from your circuit, power your circuit from a power supply (not the Roomba), and see if the 7805 still gets hot. I bet you have a short circuit in there somewhere.
ur contraption is quite cool, but could u please help me with a project titled “micro-controller based home appliance control system using bluetooth.thnx
Hi Paul:
You mean you bought the adapter for the PC? What do you connect to the Roomba in your setup? I seems to me that Tod is right, you can’t just connect a USB BT dongle to a a rooStick or even Tod’s original serial adapter, not on the Roomba side.
We just successfully built this interface, and noticed some differences from what is documented in the book.
I believe there may be 2 different versions of the BlueSMiRF product. Ours came up with a Bluetooth device name beginning with “FireFly” (instead of “BlueRadio” or “BlueSMirf”). It had a different passkey (“1234” instead of “default”). The commands to configure the baud rate were not the AT commands either, see http://www.sparkfun.com/datasheets/RF/RN_BlueportII-ref-guide.pdf
The BlueSMiRF product we used was http://www.sparkfun.com/commerce/product_info.php?products_id=582
I’ve built the interface and have paired to FireFly using pin 1234.
Now I need to find an comm interface program for Vista Ultimate 64 bit, any ideas?
Tod,
This is a left field question, but do you have any idea if the RooTooth from RoboDynamics follows the same schematic as your project?
It just dawned on me that I might be able to use the RooTooth on an Arduino board if I created a female ROI adapter and used your schematic to identify each pin.
Hi Scott,
The original RooTooth had an extremely similar schematic. I think about the only change was that it had in-line resistors on the TX/RX lines as a short-circuit protection measure.
The newly redisgned RooTooth by Sparkfun uses a new Blutooth module and has a different schematic, but I bet it works just as good or better.
Mr hi
I am a student in electronics, I prepare my graduation project study design and implementation of an electrocardiogram through the soundcard why I think a transmetre ECG signal by a bluetooth end of the bluetooth also receive and ‘injected by the end of a sound card to be treated at micro computer
For this I need help in the emission and reception of bluetooth.
While awaiting a response from you accept Mr saltutations my respectful.
Hi todbot,
Now I have some problems with my RooTooth. I’ve changed the baud rate of its Firefly bluetooth devices to 57600(my Roomba is a Roomba Scheduler), and I’ve set roobacomm.waitForDSR to true in RoombaView’s code, but it still doesn’t work. If I press the power button of my Roomba during RoombaView is running, it seems like it have received some data but just not the format, and the on-screen virtual roomba may walk around everywhere. I wonder is there still anything I have to changed?
Thank you.
if you are connecting a 500 serie roomba using Firefly, this is what you need to do to set the baut rate:
1) download this terminal first (made by the firefly company):
http://www.rovingnetworks.com/support/teraterm.zip
2)set up your bluetooth then use the aforementioned terminal program to connect to COM 4 (or whatever your SPP port is)
3)enter $$$, then you will see CMD
4)enter “U,115k,N” (without quotation mark)
5)disconnect the terminal program and now connect to roomba using your program
Note: you have to complete the sequence above before you connect to roomba every time.
According to the 500 series ROI:
http://www.irobot.com/filelibrary/iRobot_Roomba_500_Open_Interface_Spec.pdf
If you are connecting to a 500 serie roomba, you need to set the baud rate to 115200, not 57600.
I found this solution here:
http://www.roombareview.com/chat/viewtopic.php?t=8472&postdays=0&postorder=asc&start=20
Thx, Cheng. But my Roomba Scheduler is older than 500 series and the baud rate should be 57600.
I’m thinking about building one of these, but I can’t find the BlueSMiRF. I found another one made by ‘Ezurio’. Do you think this one would work instead?
Here’s the data sheet:
https://www1.elfa.se/data1/wwwroot/webroot/Z_DATA/07300635.pdf
One thing I’m especially worried about is the max voltage on the data pins (p.5 in data sheet):
UART_TX V OL max=0.2V V OH min=2.8V
UART_RX V IL max=0.8V V IH min=2.1V V IH max=3.7V
UART_CTS V IL max=0.8V V IH min=2.1V V IH max=3.7V
UART_RTS V OL max=0.2V V OH min=2.8V
Roomba outputs 5V on RX & TX, right? Would that fry this bluetooth unit??
Thanks!
/David
Hi David,
Yeah, that device definitely seems to need 3.3V inputs, which aren’t compatible with the 5V outputs on the Roomba.
The BlueSmirf (along with many other Bluetooth modules) is available from Sparkfun in their Bluetooth section.
If you do get a 3.3V device you want to connect to a Roomba, there are many techniques for doing so. Sparkfun has a good interfacing tutorial that covers some common cases.
Hi Tod,
Fantastic work. I’ll be getting your book soon… I’ve just bought a Roomba 415 and would like to use my MacMINI’s bluetooth capabilities to connect to the Roomba via a RooTooth. Is it as simple as plugging in the RooTooth and then loading the appropriate software? Or are there special steps such as updating firmware, etc. on the Roomba that must be done in order for it to work. Sorry for the noob-ish question. Thanks in advance!
If your Roomba was made in the last 3 years or so, it comes fully ready to hack. (In fact the plastic wrapper on it should have a sticker saying something to that effect) Just plug in the RooTooth and go.
One issue with some of my code presented on this site is that due to the onward march of technology (Java versions, OS updates, etc.), the code might not work on some operating systems without a recompile or slight tweaking. It’s nothing major, but I’ve not had a chance to work out any of the issues since my Roomba stuff is currently in storage.
Fortunately, there’s lots of other Roomba hacks out there that build on this code or use totally different code so you can try out a bunch of different approaches to see which ones you like.
1. I noticed that on SparkFun.com that the rootooth is changing the Bluetooth chip from the one that you used to the WRL-08497 (http://www.sparkfun.com/commerce/product_info.php?products_id=8497)
Could you explain (have you already?) how to build a Bluetooth connection using this less expensive chip (half the price)?
2. I just got my Roomba yesterday and so far it has just vacuumed (I love it). I have never programmed a Roomba. My only programming skills are in VBA and a small amount of C++. Once I have built a Bluetooth connection and paired it with my computer how do I upload the code? Where can I get a compiler? What are the language options? My first ‘project’ will be to add scheduling to my 530 which I saw an article that explained how to format a numeric string to set the date and time. I assume I could write that string in notepad but how do you send it over?
Thank you in advance, your website is an amazing help and i can’t wait to get into some more advanced projects.
Hi Alan,
That RN-41 Bluetooth module is pretty great, but requires some support circuitry (3.3V regulator & 3.3V-to-5V level translators) to work with the Roomba. Sparkfun sells a version of that module with the support circuitry and they call it the “BlueSMiRF Gold”: http://www.sparkfun.com/commerce/product_info.php?products_id=582
If you’d like to try your hand at using VB to program the Roomba, RoombaDevTools.com made a program called SCITester that might be a good starting point. It comes with the source code. For some reason their download link is down so I put it here:
http://roombahacking.com/software/scitester.zip
You might need to change it a little bit if you’re using a newer Roomba. There’s info about those changes if you search on the net (I don’t have a newer Roomba, so I can’t test). One site that might some useful info about it, and is definitely helpful if you want to add an Arduino microcontroller board to a newer Roomba is:
http://www.netfluvia.org/layer8/?p=127
Good luck and let me know how your Roomba hacking experiences turn out. :)
Thanks for the prompt response. I think I will fork out the extra cash for the same chip that you used.
As I was gathering parts I noticed that your schematic says to use (2) 1uF capacitors but the pictures show you using two different ones and the notes on Flickr.com say to use (1) .1uF and (1)1-10uF. If two different ones are required can you let me know which one goes on the right and which on the left. I am no expert in electronics, although I did pass that class :) but I believe the .1uF goes on the left hand side, is this correct?
Thanks again.
Hi Alan,
The capacitor values aren’t that critical. But for my circuit as wired-up, I used a 0.1uF on the input part of the 7805 voltage regulator and a 1uF on the output. I think I was originally going to use two 1uF but couldn’t find a second one. The main thing is to have some capacitance on both sides of the regulator and to have the total be at least 1uF. (the caps help stabilize the circuitry inside the voltage regulator)
Some people put a 0.1uF and a larger 10-100uF on both sides of the voltage regulator. A larger cap helps guard against large droops in power (“brownouts”, like if you were turning on a relay), while the 0.1uF helps guard against noise on the power line (like if you had a motor running constantly)
In this application, the BlueSmirf also has some capacitors on it to help stabilize the power, so we just have to get the power to it “good enough”.
hi nice hack, i was search for bluetooth diagram and i come across your site, am intrested on that, i will like to buy it for experience.do you sell international? becos i base in africa. reply me
hi…. i was searching for interfacing bluetooth with microcontroller and got into your site… can you pls provide me the technical details on interfacing bluetooth with a microcontroller with necessary circuit diagram and theory… Pls help us, as we are working on a project related to that… pls send the documents to the mentioned email id… thanks in advance…
[…] podmienić software i dostosować algorytm sprzÄ…tania na potrzeby wÅ‚asnego domu. Inny pomysÅ‚, to rozbudowanie robota o adapter bluetooth –przyda siÄ™ do sterowania robotem przez telefon […]
Found a serial Bluetooth adapter that works perfectly fine here:
http://www.usconverters.com/index.php?main_page=product_info&cPath=70&products_id=228
I’ve been working with the Firefly AF70 device for a design project and after playing with it’s command mode I’ve found that changing the baud rate using the ‘su’ command will save the settings so that you don’t have to set it every time you power on the radio. Here’s the documentation:
http://www.sparkfun.com/datasheets/Wireless/Bluetooth/rn-bluetooth-um.pdf
There are similar commands for setting the parity, etc.
Could this http://www.dealextreme.com/p/wireless-bluetooth-rs232-ttl-transceiver-module-80711 be used to build a rootooth replacing the Blue SMiRF? Here’s the datasheet, I think, so could TTL levels on it produce +5V? I’m an electronics n00b but I’d like to make this thing…if I could hook up my laptop to this thing it would be perfect…wireless control of my roomba 530 :)))
[…] Build A Roomba Bluetooth Adapter […]
Hi, I found this thread a few weeks ago and thinking it is pretty cool, I decided to build one myself. I followed the plans exactly, using the newer RN-42 bluesmirf silver (the PCB is red). I’m connecting to it on my android smartphone using the roomba touch drive app. The app connects to the module fine but I cannot get roomba to respond to any commands from the touch-drive app. Any suggestions? Thanks!
Hey guys:
A great writeup on programming the roomba can be read here:
http://www.robotappstore.com/Knowledge-Base/3-Serial-Port-Baud-Rate-Configuration/17.html
this goes over the SCI communications using both the rootooth (bluetooth adapter) as well as a direct serial comm. link.
Hope this helps someone!
Thank you for this hack. I bought a Bluesmirf Silver and hooked it up to my 570 with your schematic. Works perfectly. Instead of buying a voltage converter and the like, I just used an automotive USB adapter for power. See my thread here:
http://www.robotreviews.com/chat/viewtopic.php?f=4&t=16215
Bobby, you can try to press the power button to turn the robot on, then either clean or spot. The robot must be on or on the dock to respond to the bluesmirf. If you have a Discovery series (red, Discovery, Discovery SE, etc.), you can try checking the create compatibility setting on the app. Otherwise, if you have a 500 series, it should work. Just make sure the robot’s on first.
[…] iRobot Create Bluetooth adapter Year peak of todbot You can homemade ROI adapters like the Bluetooth adapter shown in the book. This entry was posted in Robots aspirateur photos and tagged Adapter, […]
Hello, I was wondering if I could buy a fully made bluetooth receiver for my roomba. The rootooth is very expensive for me just wanting to play around on a $50 roomba.Thanks,Patrick